Monday, 20 January 2014

Day One: Recreating an old design. SFX

Day One: Recreating an old design. SFX

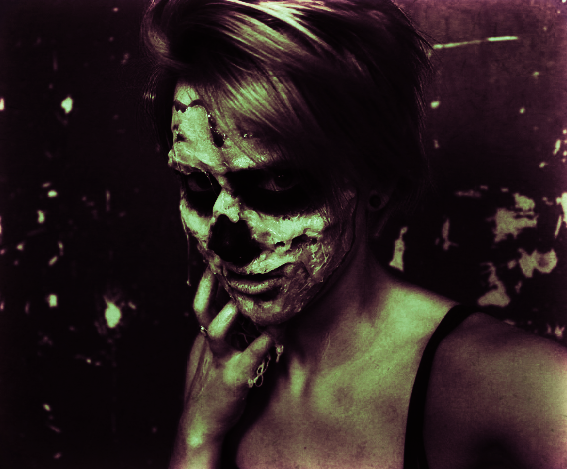
Day One: I've started to recreate one of my designs (I've linked the photo below) It's designed to look like half of my face has peeled away or been cut off? Something like that. I did think about creating a mold of the part that's been peeled off but I didn't know how to do it at first. 

Now it's been over two months nearly three and my friend linked me to an artist that had the same idea! Well a tad the same.. (I'll link her name as soon as I find it again) I wasn't annoyed that someone else had the same idea since it's finally gave my mind to peace with the design. I'm not completely copying her design, just the idea of her making the face from a mask (casting).

And that's what I did. I had left over casting strips from my castings I did at college so lucky on that part and lucky that I've done over 30 cast faces on myself that I knew what to do! It's not really hard though.. well this kind of casting isn't.

Step One: Cut out lots of casting strips, have water ready, tissue paper and Vaseline.. ha

Step Two: Put Vaseline all over the face and rip off some tissue paper (Toilet Paper) and place over any hair on the face, I did it on my eyebrows.

Step Three: Start placing the casting strips on you're face. Don't go too close to the eyes and don't cover the nostrils or you won't be able to breath haha  

I'd put maybe 4-5 layers so that'll be less likely to fall apart.


Step Four: I left it for 5 minutes but you could leave it for more but I didn't bother.. It'll still be a tad wet and will be fragile so be careful when taking it off which all you need to do is make lots of weird faces and it'll slowly start coming off. Don't rush taking it off! Leave it alone for a few hours, just to let it harden.

Step Five: I took a hand full of cotton wool pads and placed some behind the eyes part, this let me fill in the eyes. It won't look as right and if you can find any other way that'll look more eye shaded then do that but this was the way I did it. It still looks okay for now, I haven't started on the eye part yet so I'll decide then if the cotton pads have worked or not. It was more of a background to place the casting strips on.

(Sorry for the quality of the photos, using my laptop camera)


Step Six: Fix the shape that you want, you'll need someone to help as you won't be able to see (Really should have done this part before the eyes) Mistakes that I'll learn. I decided to just take photos and see which shape I'll cut from it.

Step Seven: Getting the right colour! Now this part is where it get's tricky.. well it has for me. 
I'm using Acrylic paint and that's as far as where I've got to. 

I will continue once I've made progress.. 

(This is the design I am recreating)


Friday, 17 January 2014

Slowly getting better... SFX

Looking back..

Looking back on my process on special effects makeup. Can't believe it's not even been a year yet, learnt so much and still learning. 

First Photo-
Created: 28 ‎February ‎2013
Time: 5 minutes

Second Photo-
Created: 01 ‎January ‎2014
Time: 5 minutes


Wednesday, 15 January 2014

Cut knee (Special effects)


Cut Knee
Rolled out scar wax, blended in and sliced in the middle. Extra bruising with eyeshadow and black&red face paint in the cut. 
And blooooooood of course ;]

This was just a quick bored cut I decided to create took no more than 10 minutes. 
And the white scar below it is a real scar from my first knee operation haha
Plus scars next to the cut but never mind those.. 


Wednesday, 1 January 2014

Old to Now (Special Effects)

Looking at old photos.
And how crazy how a couple of months can make a difference.


 1. This was taken from the very beginning, and me saying to myself "This isn't going to work out" But after just two weeks or less of research and watching Tutorials, I was creating something completely different and more realistic than I first began. I've always been like that with art, I ALWAYS want to try something new and if I don't succeed at first I will spend forever researching and getting it to the best I can do. 
  

2. I began doing this with just normal makeup, no latex or Gelatin. I was never sure if I'd be able to do all these weird creature looking faces that I was seeing online. I tried and failed a few times but I also tried and got amazing looking faces from it. The second photo was my first time using Gelatin, I didn't know what I was doing at first so I played around and this is what happened. I'm happy with it and I was able to learn how to use it and how not. 


3. Getting you're own ideas. I wasn't sure what the hell I was doing at the beginning, I tried to recreate other looks and it just came out a mess. Let you're mind go free, have a rough photo of what you want but other than that I wouldn't spend ages on YouTube recreating looks. Is that a bad thing to say? Oh well. I'm not saying my looks are original because I'm sure there is photos similar out there like everything else but as you all are different shapes, sizes, colour ect then you need to realize that you got to figure out a look on you're own. If that makes sense? I hope so. 


4. First time and second time I made a nose, I was pretty proud of them both if I'm honest. There are so many looks that you can do while using cheap products. Don't need to freak out about having to buy expensive products which I did at the start BUT now I've realized that if I work harder and learn then I can create a creature just as good! 

I've no idea what this post is about, just felt like having a wee rant to myself.  

How The Grinch Stole Christmas! Makeup.

The Grinch

I haven't done Special Effects in a while, been over a month I believe. Just had a LOT of drama happening. Sorry about that. I decided to get into it today, as I'm not even sure, my mind and body just wanted to create something. 
I did see over the Christmas times which reminds me (Merry late Christmas & Happy New Year) I seen a LOT of Christmas Special Effects looks but one of my favourite Christmas movies to watch is: How The Grinch Stole Christmas
Soooo... I did the makeup! haha

(Lost track what I'm trying to say but here is photos)

I used only 5 products. 
  • Snazaroo - Dark Green
  • Snarazoo - Black
  • Latex
  • Cotton Wool
  • Eye Liner Pencil 


https://www.facebook.com/amythealien


Thursday, 7 November 2013

The Girl.


So.. I haven't done makeup in over a month. I honestly haven't a clue what makeup to do or even been in the mood to do makeup so I decided to leave it for a while.. Sorry. I need to be more creative! I'm not really sure what I've created today.. A girl with a ripped off face.. Ehm yeahh

I never done makeup in October.. I'm sure that's a tad odd since Halloween is usually the day for weird looks like these.. Oh well. 

https://www.facebook.com/amythealien

Products:
Beautyuk eyeshadow collection - naked (7)
Makeup Academy PRO-BASE Eye Primer
Makeup Academy Eye Shadow. Shade 20 Matt 
Makeup Academy Intense Colour Lip Liner - Red Drama 
Eye Line [Kolor] Black

2 tbsp Gelatin 
2 tbsp Gylcerin 
2 tbsp Water

Fake Blooooooood


Wednesday, 2 October 2013

Mad Hatter?


Mad Hatter

I tried and failed. I was going to cut hair from my extensions and place them over my eyebrow but I didn't have glue and wax didn't work so I decided to destroy it or draw in eyebrows. All I did was cover my eyebrows in wax, paint over in white face paint and then with orange eye shadow I created eyebrows. 
It's a pretty simple look if I'm honest, I didn't make it complicated at the end. Maybe at the start with the eyebrows but never mind that.. ha

Just need to get the costume and hat! Halloweeeen time! 
I'm really wanting to do a Tim Burton characters series.. But I'm not sure.  


Edited.